Explore Jit Features
Below are some of the core features of Jit's platform. See the Jit Product Demo Hub to view demo videos for some of these features.
Developer UX: Empower developers to secure everything they code
Learn how Jit makes it easy for developers to quickly resolve code security issues before production.
To try the developer user experience yourself, create a pull request in GitHub or merge request in GitLab with our deliberately insecure code snippets. Jit provides feedback before the code is merged.
To scan code via pre commit hooks in VS Code, learn how to set up the VS Code integration.
Manage risk across your applications and infrastructure
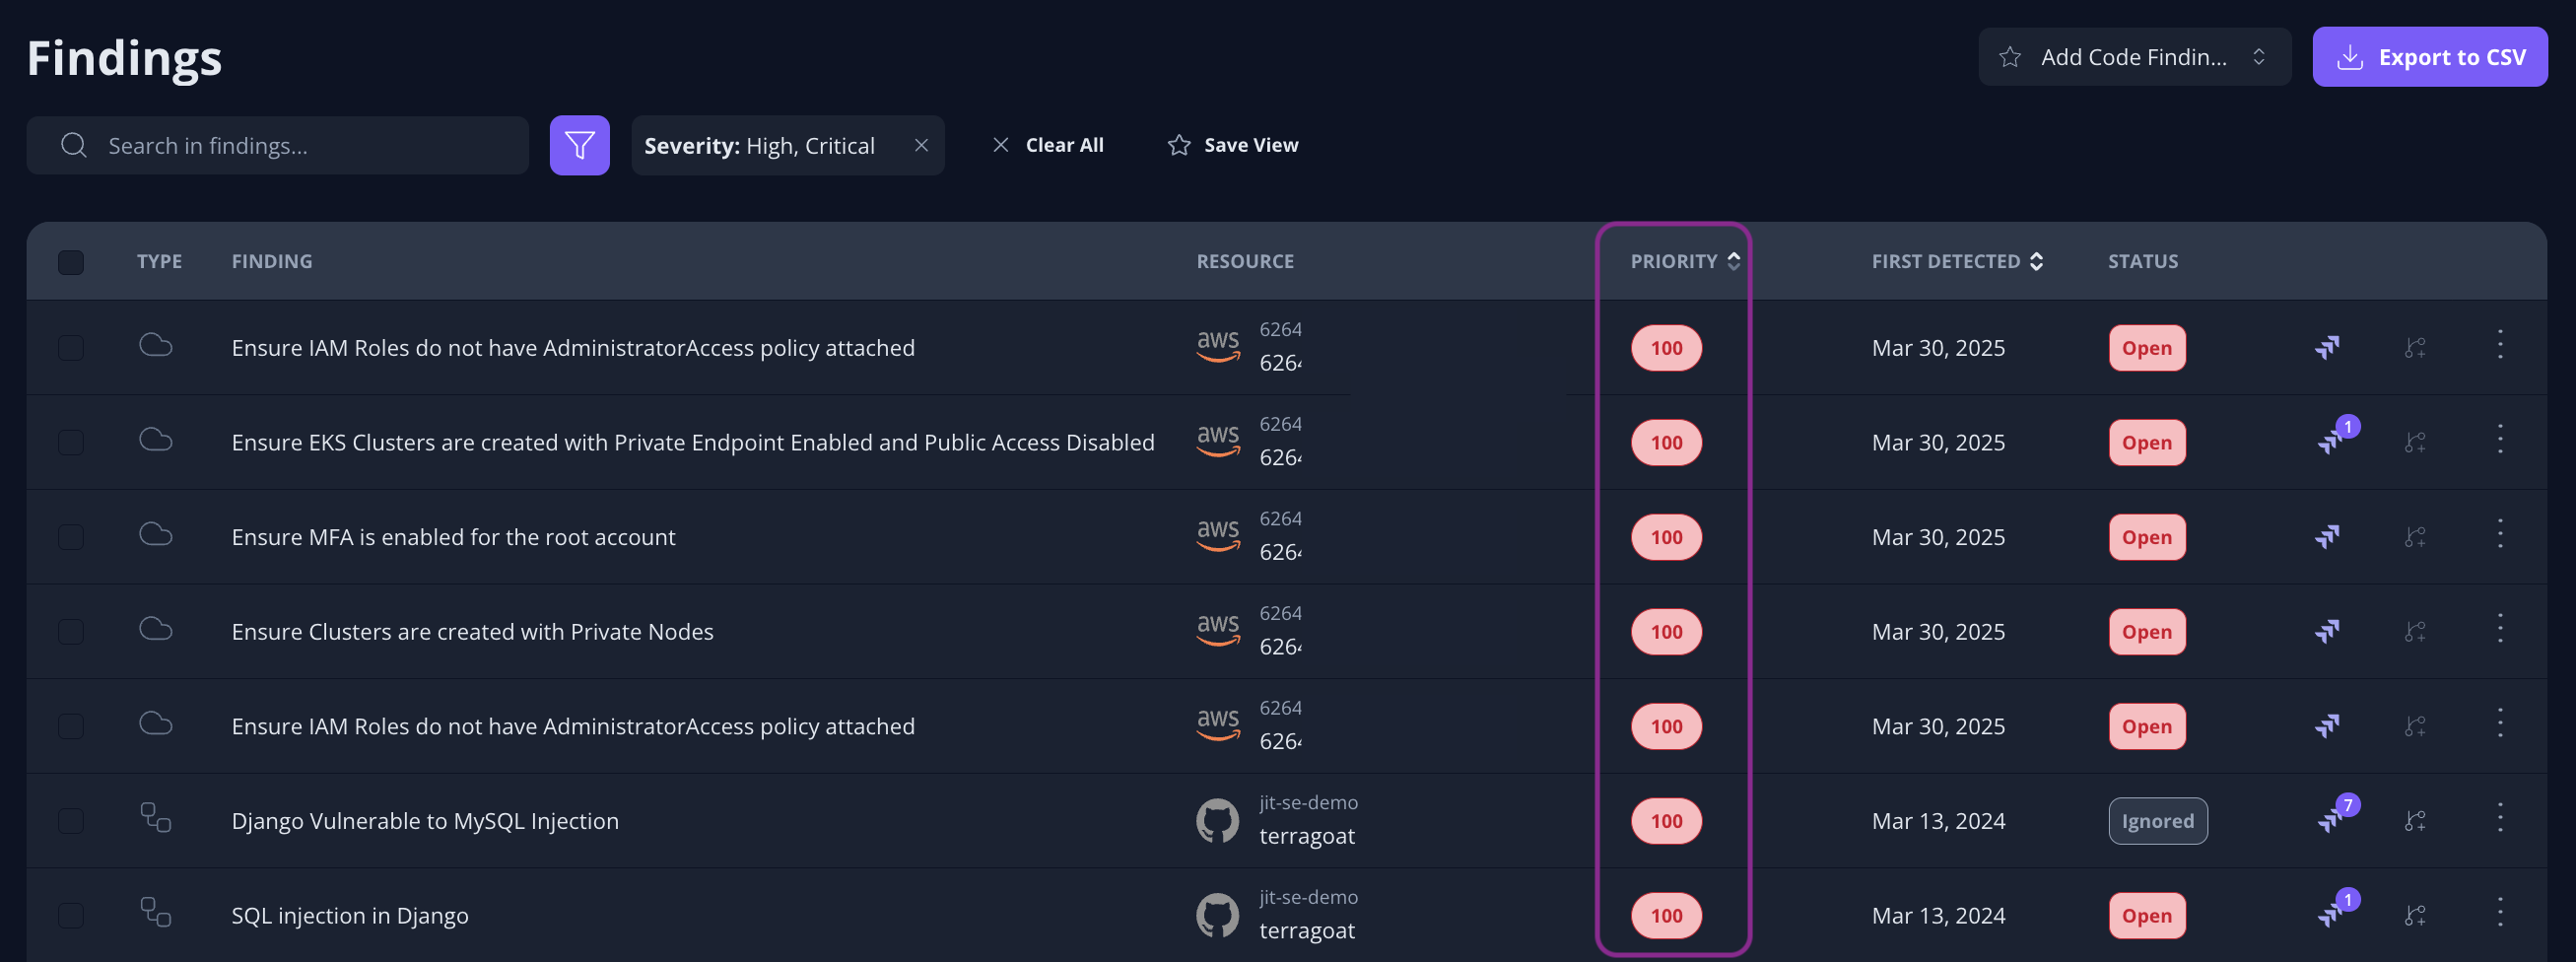
The Findings page is where you review, search, and manage all security findings detected across your environment. It helps you quickly understand what needs attention, prioritize risks, and track remediation status.

Example of the Findings page showing the search field, filters, and findings list.
Learn more about the Findings page here.
Prioritize the top product security risks in your environment
After scanning your codebase and cloud environment for security issues, Jit automatically prioritizes the top product security risks based on runtime and business context – like whether they’re exposed to the internet or call a sensitive database.
This information is synthesized into a Priority Score for each security issue detected by Jit.
Integrate Jit with AWS to enable Context Engine
To configure Context Engine, integrate Jit with AWS to provide visibility into your cloud environment. Additionally, contact Jit so we can open the feature for you account.
By opening up a security issue within the Findings page, you can visualize how the issue is deployed in runtime with Jit’s Finding Graph.
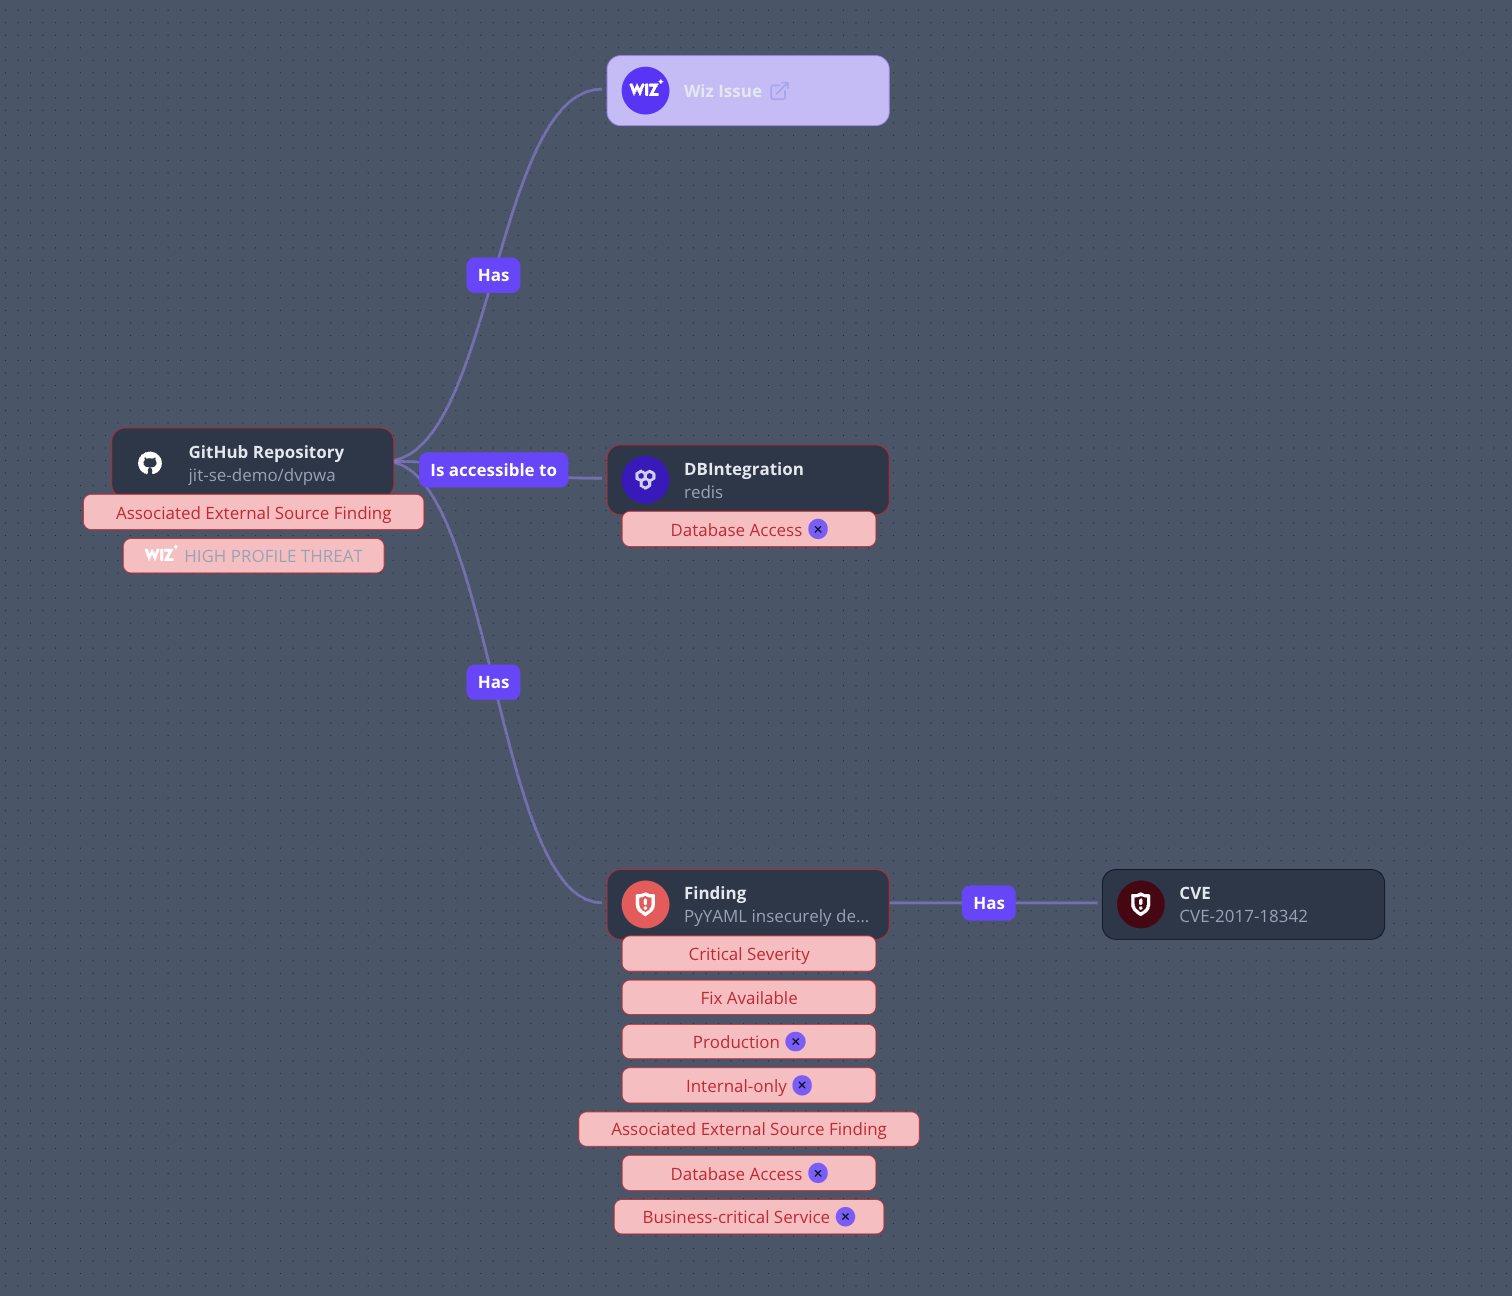
This visualization describes how the security finding is deployed. Labels are attached to the relevant resources to describe the prioritization factors, like whether the issue is deployed to production, calls a database, is exposed to the internet, and so on.
Integrate Jit with a notification endpoint
Follow the links below to begin triaging security issues in Jit to your endpoint notification system.
Expand your product security coverage
Jit unifies the following product security scanners onto one platform – making tens of scanners feel like one.
Scan your customer code for security flaws with Static Application Security Testing (SAST). Jit SAST scans all common code languages. Learn more about Jit SAST here.
- Jit SAST is automatically activated when you onboard Jit, which scans your selected repos/projects and records security findings in the Findings page, while implementing continuous scanning for every code change in GitHub, GitLab, or your IDE.
- Test Jit SAST by creating a pull request in GitHub or merge request in GitLab with these deliberately insecure code snippets in Python, Javascript, and Go. Jit provides security feedback before the code is merged.
Scan your open source components and dependencies for known vulnerabilities using Software Composition Analysis (SCA). Jit SCA scans all common code languages. Learn more about SCA here.
- Jit SCA is automatically activated when you onboard Jit, which scans your selected repos/projects and records security findings in the Findings page, while implementing continuous scanning for every code change in GitHub, GitLab, or your IDE.
- Test Jit SCA by creating a pull request in GitHub or merge request in GitLab with these deliberately insecure code snippets in Node and Python. Jit provides security feedback before the code is merged.
Scan your codebase for copyleft open source licenses like GPL with Open Source License Detection. Jit Open Source License Detection scans all common languages. Learn more about Jit Open Source License Detection here.
- Activate Open Source License Detection by going to the left menu in the Jit app and navigating to ASPM → Security Plans → Jit Max Security Plan and activate “Scan your code for license violations”.
- Activation will scan your repos/projects for copyleft open source licenses, while implementing continuous scanning for every code change in GitHub, GitLab, or your IDE.
Scan your codebase for hard coded secrets with Secrets Detection. Jit Secrets Detection scans all coding languages. Learn more about Jit Secrets Detection here.
- Jit Secrets Detection is automatically activated when you onboard Jit, which scans your selected repos/projects and records security findings in the Findings page, while implementing continuous scanning for every code change in GitHub, GitLab, or your IDE.
- Test Jit Secrets Detection by creating a pull request in GitHub or merge request in GitLab with this deliberately insecure snippet. Jit provides security feedback before the code is merged.
Create a continuously updated inventory of your codebase with Software Bill of Materials (SBOM). Jit SBOM scans all common coding languages. Learn more about Jit SBOM here.
- Activate SBOM by going to the left menu in the Jit app and navigating to ASPM → Security Plans → Jit Max Security Plan and activate “Generate a Software Bill of Materials (SBOM)”.
- After activation, wait a few minutes and navigate to My Environment → SBOM in the left menu to see your SBOM.
Scan your IaC files for infrastructure security misconfigurations with IaC scanning. Jit IaC Scanning supports Terraform, Pulumi, serverless manifest files, CloudFormation, AWS CDK files. Learn more about Jit IaC Scanning here.
- Activate IaC scanning by going to the left menu in the Jit app and navigating to ASPM → Security Plans → Jit Max Security Plan and activate “Scan your Infrastructure as Code (IaC) for misconfigurations”.
- Activation will scan your selected repos/projects and record security findings in the Findings page, while implementing continuous scanning for every code change in GitHub, GitLab, or your IDE.
- Test Jit IaC Scanning by creating a pull request in GitHub or merge request in GitLab with this deliberately insecure terraform snippet. Jit provides security feedback before the code is merged.
Scan Kubernetes manifest files for security misconfigurations with Kubernetes Scanning. Learn more about Jit Kubernetes Scanning here.
- Activate Jit Kubernetes Scanning scanning by going to the left menu in the Jit app and navigating to ASPM → Security Plans → Jit Max Security Plan and activate “Scan your Infrastructure as Code (IaC) for misconfigurations”.
- Activation will scan your selected repos/projects and record security findings in the Findings page, while implementing continuous scanning for every code change in GitHub, GitLab, or your IDE.
Scan your dockerfiles for code security flaws and misconfigurations with Dockerfile Scanning (container scanning on build or in your registry coming soon). Learn more about Jit Dockerfile Scanning here.
- Activate Jit Dockerfile Scanning by going to the left menu in the Jit app and navigating to ASPM → Security Plans → Jit Max Security Plan and activate “Scan your Infrastructure as Code (IaC) for misconfigurations”.
- Activation will scan your selected repos/projects and record security findings in the Findings page, while implementing continuous scanning for every code change in GitHub, GitLab, or your IDE.
Scan your cloud infrastructure in runtime for infrastructure security misconfigurations using Cloud Security Posture Management (CSPM). Learn more about Jit CSPM here.
- Activate Jit CSPM by integrating Jit with AWS, Azure or GCP. Then, activate Jit CSPM by going to the left menu in the Jit app and navigating to ASPM → Security Plans → Jit Max Security Plan and activate “Scan infrastructure for runtime misconfigurations”. This will scan your cloud infrastructure daily.
- See the integration pages for AWS, Azure, and GCP.
- Security findings are recorded in the Findings page.
Scan your web applications in runtime using Dynamic Application Security Testing (DAST). Learn more about Jit DAST for web apps here.
- Activate Jit DAST by going to the left menu in the Jit app and navigating to ASPM → Security Plans → Jit Max Security Plan and activate “Scan your web application for vulnerabilities”. This will open the configuration wizard to configure periodic scans.
- Security findings are recorded in the Findings page.
Scan your APIs for vulnerabilities using Dynamic Application Security Testing (DAST). Learn more about Jit DAST for APIs here.
- Activate Jit DAST by going to the left menu in the Jit app and navigating to ASPM → Security Plans → Jit Max Security Plan and activate “Scan your API for vulnerabilities”. This will open the configuration wizard to configure periodic scans.
- Security findings are recorded in the Findings page.
Scan your GitHub environment for security misconfigurations with Jit CI/CD Security. Learn more about Jit CI/CD Security here.
- Activate Jit CI/CD Security by going to the left menu in the Jit app and navigating to ASPM → Security Plans → Jit Max Security Plan and activate “Detect GitHub misconfigurations”.
- Ensure branch protection is enabled and that MFA is enabled for your GitHub organization by going to the left menu in the Jit app and navigating to ASPM → Security Plans → Jit Max Security Plan and activate “Verify that Github Branch Protection is properly configured” or “Verify that MFA for your GitHub organization is enabled”.
- Activation will periodically scan your GitHub environment and record security findings in the Findings page.
Updated 5 months ago